Dockable Interface Components
Advance Design offers the flexibility to personalize your workspace through dockable interface components. These components can be anchored to any edge of the graphic area or allowed to float freely within the user interface, providing the versatility to organize your workspace as needed. Additionally, they can be resized or grouped, enabling you to optimize your working area for efficiency and ease of use.
Dockable interface components include:
-
Toolbars: Essential tools at your fingertips, customizable for quick access.
-
Interface windows: Including the Project Browser, Properties Window, Command Line. These can be docked individually or grouped in a tabbed or multi-window arrangement, allowing you to free up space in your working area.
Navigate directly to your section of interest:
- Displaying and docking options for toolbars
- How to change the default docking position of a toolbar
- How to undock a toolbar
- How to redock a toolbar
- How to change the docking location of an interface window
- How to undock an interface window
- How to group interface windows
- How to ungroup tabbed windows or windows gathered in a multi-window group
- How to resize dockable interface components
In this section you will find useful information to help you organize the Advance Design interface to suit your project requirements and personal preferences, making your design process more efficient.
1. Toolbars
You can place Toolbars anywhere in the Advance Design environment. They can be displayed as floating (located anywhere in the drawing area) or docked (attached to any edge of the drawing area). You can also resize and organize them to help you work faster and more efficiently.
Displaying and docking options
After selecting a toolbar from the Display menu (Menu button > Display > Toolbar) or from the interface components context menu (accessible by right-clicking the drawing area edges), it will be displayed and docked automatically on the upper, grey edge of the drawing area, right beneath the Ribbon.
You can display more Toolbars simultaneously:

Displaying multiple Toolbars
How to change the default docking position of a toolbar
You can also change the docking position of Toolbars according to your needs:
-
Place the cursor on the dots at the left side of the toolbar:

-
Hold down the button and drag the toolbar to any of the drawing area edges.
Note: The mouse pointer will change from the arrow to this shape  as soon as you position the cursor on the left-side dots and until the toolbar in the desired docking area.
Toolbars docking regions are at the top, bottom, or either side edge of the graphic area:
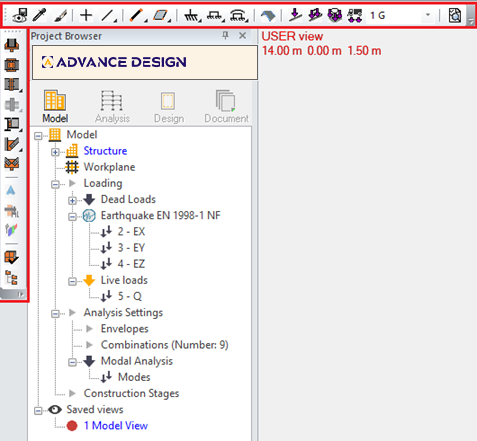
Toolbars docking regions
Note: The Quick Access Toolbar default position (integrated into the software title bar) can be changed only by replacing it below the toolbar. For further details on how to do this, see this page.
How to undock a toolbar
You can easily undock Toolbars from the graphic area edges to have them floating and thus position them anywhere else in the Advance Design environment.
To undock a toolbar:
-
Position the cursor on the dots at the left side of the toolbar and hold down the button.
-
Drag the toolbar away from its docked location and release the button whenever the floating location suits you.
-
Alternatively, you can also undock a toolbar by simply double-clicking on the toolbar's left-side dots. You can then drag it to your interface location of choice.
Note: The toolbar will change shape once it is positioned out of a docking area (floating) and a title bar containing the toolbar name will appear on top of it:

You cannot float/undock the Quick Access Toolbar, therefore its shape will not change.
How to redock a toolbar
To redock a toolbar on one of the graphic area edges:
-
Position the cursor on the toolbar title bar or in any blank, iconless area, and hold down the left mouse button.
-
Drag the toolbar to any docking location at the top, bottom, or either side of the graphic area.
-
As soon as the toolbar changes to its original docking shape, release the button. The toolbar will automatically dock.
You can also redock a toolbar by simply double-clicking on the toolbar title bar. The toolbar will then automatically dock to its initial location.
To place a toolbar in a docking region without actually (re)docking it, thus preserving its title bar on top, hold down the <Ctrl> key as you drag.
2. Interface windows
The Advance Design interface windows are:
They are docked by default on the left, right and bottom edges of the graphic area:

Advance Design interface windows
However, you can easily change the windows docking location, undock them or even gather them in a unique, multi-tabbed window or a multi-window group.
How to change the docking location of an interface window
Moving a window to dock it at a new position is very easy:
-
Click on the window title bar and start moving it while holding down the left mouse button
-
A four-arrow symbol will appear in the interface center and four more arrows will appear at the center of each graphic area edge. A total of 8 blue arrows are thus visible:

Changing the docking location of a window
-
Sliding the window to be redocked on either one of the blue arrows will reposition it in the new docking location indicated by the arrow's direction.
A preview of the window's new position appears as a blue rectangle:

-
Your window will be docked in its new position as soon as you release the left mouse button.
How to undock an interface window
You can easily undock interface windows from their default locations around the graphic area in order to position them anywhere else in the Advance Design environment.
To undock an interface window:
-
Position the cursor on the window title bar and hold down the button.
-
Drag the window away from its docked location.
-
Release the button whenever the floating location suits you.
You can also undock a window by simply double-clicking on the window title bar. You can then drag it to the desired location.
Note: Having an interface window docked or floating is also possible by right-clicking on its title bar and selecting the desired option. Right-clicking on the window title bar also allows you to access an extended list of display commands to hide or auto-hide the interface component.
How to group interface windows
To free up space on the graphic area or just to better organize the Advance Design interface, you have the option to create a tabbed window with each tab containing a different interface window or to create a multi-window group.
In both cases, any two or all three of the interface windows will be accessible from a single location, thus covering the same amount of space in the software environment.
To create a multi-tabbed window:
-
Click and drag on the title bar of the interface component you want to add to another window / group;
-
When reaching the title bar of the receiving window / tabbed group, simply release the mouse button. The dragged window is added as a tab at the bottom of the multi-tabbed window and can easily be identified by its name:

Creating a multi-tabbed window
-
Click any of the tabs to display the corresponding window.
To create a multi-window group:
-
Click and drag on the title bar of the interface component you want to group with another (multi-tabbed) window;
-
When the dragged window overlaps the window you want to group it with, the four-arrow symbol appears;
-
Click on one of the symbol arrows indicating the position of the dragged window within the window group. A preview of the chosen position appears as a blue rectangle;
- Release the mouse button. The dragged window will be displayed as part of the window group and arranged according to the position you have previously selected by clicking on one of the 4 arrows of the central symbol:

Creating a multi-window group
How to ungroup tabbed windows or windows gathered in a multi-window group:
-
Click the tab corresponding to the window you want to remove from the multi-tabbed window / click the title bar of the window you want to remove from a multi-window group.
-
Simply drag the window outside of the tabbed window/group and then drop it onto a new location in the Advance Design environment.
You can also restore a window to its previous, ungrouped position by double-clicking either on its corresponding tab or on the window title bar.
How to resize dockable interface components
Toolbars
Toolbars can be resized only when floating:
-
Position the cursor on the edge of a floating toolbar, so the cursor changes to a horizontal or vertical double arrow:

Resizing interface components
-
Hold down the button and move the arrow cursor until the you obtain the desired shape:

Resizing interface components
Note: You cannot float/undock the Quick Access Toolbar, therefore it cannot be resized.
Interface windows
When docked, the Project Browser, Properties Window and Command Line panes can be resized in width or height by dragging their edges (using horizontal/vertical split of the cursor) according to the side(s) of the graphic area the window is pinned to. For example, if a window - let's say the Project Browser - is docked to its default position on the left of the graphic area, it can only be enlarged in width by dragging its right border towards the graphic interface:

Resizing interface windows
When undocked or grouped in a single (multi-tabbed) window, the interface windows can be resized and brought to any desired shape:
-
Position the cursor on an edge (the cursor changes to a horizontal or vertical double arrow) or on a corner (the cursor changes to a diagonal double arrow).
-
Hold down the button and move the arrow cursor until you obtain the desired shape.

Resizing interface windows